
Documentation: Chapter 2
Installation for IIS/PWS on Windows
In order to install FlashStats on a Windows system for use with Microsoft IIS or PWS, just follow these instructions.
Step 1: Run Setup
Download the original setup program from the Maximized Software download site. After is has finished downloading, run setup by double-clicking on the file that you downloaded (FS_15.EXE).
Setup will install FlashStats into the correct directories, and will set up a sample "user account" so that you can begin working with FlashStats almost immediately.
Be sure to read the Read Me file for any last-minute information.
Note: If you ran the setup program under Terminal Services, a necessary file (SH33W32.DLL)
may not have been installed to the correct location. Make sure that this file is in the
System32 directory (usually something like C:\WinNT\System32).
If it is not there, then search your system for the file, and move it into the System32
directory when you've found it. (It may have been incorrectly placed into a directory
such as C:\Documents and Settings\Current User Name\Windows.)
Also make sure that the FlashStats.exe CGI has sufficient permission to access the DLL
(try granting Read and Execute permissions to Everyone).
Step 2: Configure Logging Options
FlashStats setup cannot configure IIS automatically, so there are a few steps that you need to do manually in order to get the fullest capabilities out of FlashStats.
Start up Internet Service Manager (from the Microsoft Internet Information Server menu). Select the web site that you want to configure and choose Properties from the Action menu. Or, if you want to configure all of the web sites hosted on a computer, select the computer in the tree at the left of the window and choose Properties from the Action menu, then make sure WWW Service is selected and hit the Edit... button. In either case, you should now have the Web Site Properties dialog box displayed, as shown here.
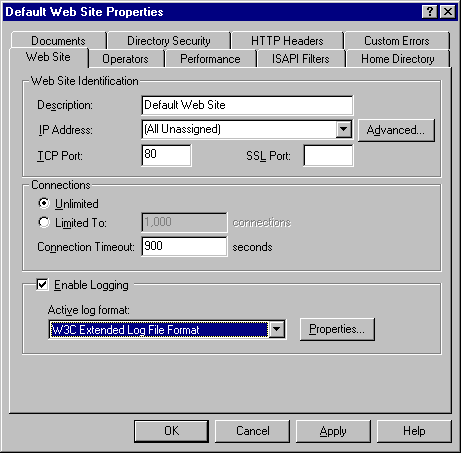
Make sure that Enable Logging is selected (checked), and choose W3C Extended Log File Format from the Active log format list. This format is the most flexible and allows you to easily add the referrer and user agent fields so that FlashStats can generate advanced reports like the Search Phrases Report. If you are running with the Microsoft IIS Log File Format instead then you will not get the two extra fields and won't be able to run the advanced reports.
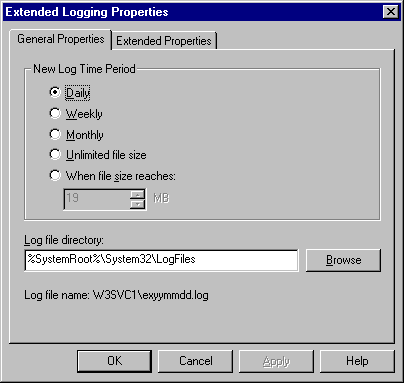
After making sure that the W3C Extended Log File Format is selected, click on the Properties... button to display the Extended Logging Properties dialog box. The General Properties tab should look something like the one shown below. Choose the desired log frequency; Daily is the recommended setting since it will allow FlashStats to operate on smaller log files and thus avoid reading more data than necessary (in most cases). Also, notice the values shown for the Log File Directory and Log File Name; you'll need these values later.
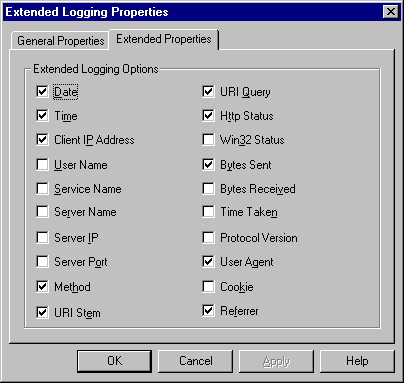
Now look at the Extended Properties tab (shown below). You need to select at least all of the data fields as shown here. You can also select additional fields, but FlashStats does not require (and will not use) them.
After making any necessary changes, click OK as necessary to save and apply your changes.
Finally, you need to tell FlashStats where to find the extended log files. Open the FlashStats.ini file (using a plain ASCII editor), located in the same directory as FlashStats.exe, usually your web site's /scripts directory. Scroll down to the bottom and you'll find a line that starts with user=sample (without a leading # mark). At the end of the line you'll see a parameter of the form logs=c:\winnt\system32\logfiles\in*.log or something similar. You need to edit the value to the right of the equal sign so that it specifies the full path to the web site's log files, using the data in the Log File Directory and Log File Name fields that you noted above (on the General Properties tab of the Extended Logging Properties dialog box). Usually your value will end up looking something like logs=c:\winnt\system32\logfiles\w3svc1\ex*.log. Of course, be sure to modify this as appropriate for your log files. Please note that if you edited the properties for all web sites above (rather than for just one web site) the Log File Name field will look like W3SVCX\exyymmdd.log. In this case, the X at the end of W3SVCX merely represents a number corresponding to the web site, rather than a literal X character. So be sure to use Windows Explorer to find the actual directory name for the web site's log files.
When you've made these changes, save and close your configuration file.
Note:
If your computer is hosting more than one web site, you can create additional user account lines in the FlashStats.ini file, one for each web site. Be sure to give each account a distinct name (ie, the value following user=) and edit the other parameters, especially the logs= parameter. This is explained in more detail in Chapter 5: Common Tasks.
Step 3: Set File Permissions
This step only applies if you are running FlashStats on a Windows NT system with the NTFS file system!
If you are running FlashStats on a Windows NT system, then you need to set certain file permissions. If you do not grant these permissions, then FlashStats will not be able to read or write necessary files and may generate empty reports. If you are not running FlashStats on a Windows NT system, or if you are running on NT but are not using the NTFS file system, then you can ignore this entire step and jump down to Step 5.
You need to determine which Windows NT user account is used by WebSite when it runs. When the web server (IIS or PWS) is installed, a default "user account" is created for the web server to use when accessing file. Usually, this user account is named something like IUSR_computername. For example, if the (NetBIOS) name of your computer is NTSERVER1 then the name of the web server user account would be IUSR_NTSERVER1. This user account is the one that needs "Change" permission to your log files.
 You use the Directory Permissions dialog box to set directory permissions, and use the File Permissions dialog box to set file permissions.
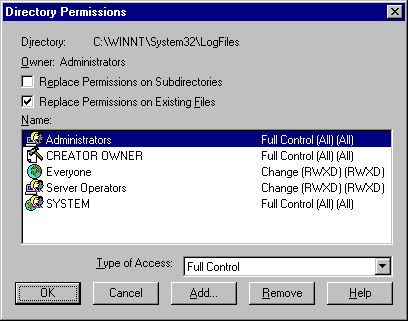
Let's first set the directory permissions for the log files directory. Open the properties for the log file folder (the default is usually C:\WINNT\System32\LogFiles); click on the Security tab of the Properties dialog box, then click on the Permissions... button.
Now, look at the permissions for the log file directory. Does the web server user account (eg, IUSR_computername) already have Change (or Full Control) permissions? Alternately, does the Everyone account have Change (or Full Control) permissions? If neither, then you need to add Change permissions for the web server user account.
To do this, click on the Add... button. The Add Users and Groups dialog box will pop up. Click on the Show Users button. Select the web server user account from the top list box, and click on the Add button to add it to the lower list box. In the Type of Access drop-down list, choose Change. Then click the OK button to return to the Directory Permissions dialog box.
You will see that the web server user account has been added to the list of directory permissions, with Change rights. Make sure that the Replace Permissions on Existing Files checkbox is checked on (enabled). Finally, hit OK to apply the new values to all existing files and to the directory itself.
Now follow similar procedures to set the directory permissions for all of these directories (you just set the permissions for the second directory listed):
Directory Permissions
|
|
| Directory |
Rights |
FlashStats program directory
Example: C:\Program Files\Maximized Software\FlashStats |
Change |
(Archived) logs directory *
Example: C:\WINNT\System32\LogFiles |
Change |
FlashStats HTML directory
Example: C:\WINNT\System32\InetPub\wwwroot\FlashStats |
Read |
|
* Note: FlashStats needs Change directory permissions in order to be able to create and delete some special files in the archived logs directory. Note that if your current log file is in a different directory than your archived log files, then FlashStats only needs Change permissions to the directory containing the archived log files. Of course, as for file permissions, FlashStats needs to be able to read all log files.
After assigning directory permissions, use the File Permissions dialog box (in Windows Explorer) to set these file permissions:
File Permissions
|
|
| File(s) |
Location |
Rights |
| Log files |
Log directory |
Read |
FlashStats.ini |
CGI directory |
Read |
|
Of course, you can grant a higher level of priveleges than described here; these values are just minimums. In addition, it doesn't matter if you grant these rights to the web server user account directly, or to a group that the user belongs to (such as Everyone).
Step 4: Configure a Web Service Extension in IIS
This step only applies if you are running FlashStats
on IIS 6!
If you are running IIS 6 then you will need to configure it to let the FlashStats.exe CGI run.
To do this, open the Internet Information Services Manager (Start / Programs / Administrative
Tools). Expand the desired computer (usually the local machine). Select the Web Service
Extensions node, then add an Allow entry pointing to the FlashStats.exe file.
More detailed instructions on adding a web service extension are available from the Microsoft
web
site.
Step 5: Run a Report
Fire up your web browser, and connect to the machine on which you installed FlashStats. Request this document (changing the host name as appropriate):
http://www.mydomain.com/FlashStats/
Your browser should display the FlashStats Report Request Form.
Note: Look at the date fields on the Report Request Form. If they do not show the
current year then you'll need to make some minor edits to the Report Request Form. See
Tech
Note FS1456 for full details. (You should make the edits before continuing.)
After verifying that the date fields are correct, go ahead and hit the Generate Report
button, then wait for FlashStats to generate the report.
That's it! You've successfully run your first FlashStats report. If you'd like to customize your FlashStats installation, you should continue on to Chapter 3.
If you encountered any problems, you may want to jump to the support area of our web site.
Version 1.5 -- Last update: 1/14/05